
Guide
Infrared photography is also easy
by David Lee

Achieving a good colour mix in infrared photos is tricky. I used to need Photoshop for this, but now I can do it without it.
In 2020 I turned my old Nikon D90 into an infrared camera. The modified camera also captures reflected infrared, which shows up particularly well on plants. After my first few attempts, I came to the conclusion that taking photos with it wasn’t that difficult – but editing the images was a challenge.
The camera works with the Hoya R72 infrared filter, which blocks all light below 720 nm. This means that infrared images consist practically exclusively of red tones. The easiest way to turn that into something attractive is with a black and white image. However, things get difficult if you want different colours in your image.
Specifically, I couldn’t make the sky blue in Lightroom on my first few attempts. I had to switch to Photoshop, where I can choose Image > Corrections > Channel Mixer and then swap red and blue.
Almost four years have passed since then and things have moved on. Software developer Kai Bruchmann has released Infrared Photo Editor – a small app for iPhone and iPad that changes the colour channels as described above at the touch of a button. Simply tap on «Channel Mix IR», adjust the tonal value a little more and you have an infrared photo with a blue sky.
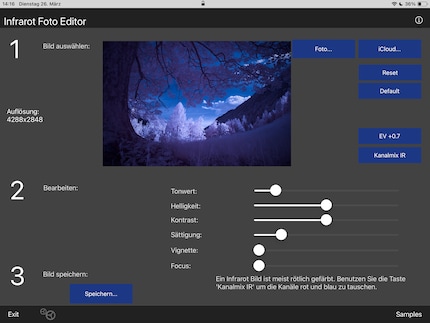
However, the app can do practically nothing else. The remaining controls for brightness, contrast and saturation are too imprecise for me, and vignette and focus are definitely just gimmicks. This is by no means a replacement for editing in Lightroom.
But Lightroom itself can now do more. Automatic selection of the sky works quite well, and it can then be edited separately. This allows me to colour the sky blue without giving the rest of the image a blue cast.
However, this is rarely a reasonable option for my infrared photos. By far the most common subject is trees, and Lightroom only partially recognises the sky between all the leaves.
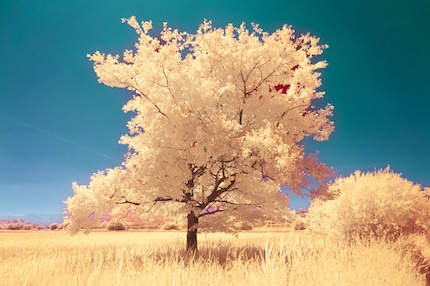
So, there’s still nothing better than swapping colours using the channel mixer. The good news is that you can get Lightroom to swap channels too. It’s not a standard option, but it can be done with a little tweak.
In Photoshop, channel mixer settings can be saved as a profile. This can then be used like any other colour profile in Lightroom. Creating a profile is explained in this tutorial, but it’s really complicated. That’s why I’ve already created two profiles for you. Importing them into Lightroom is easy: just go to «File > Import Profiles & Presets…».
One profile simply swaps the red and blue colour channels. The second also lowers the green part in the blue channel. This gives the light colours a warmer tone, which I usually like. However, it also makes the image a little darker.
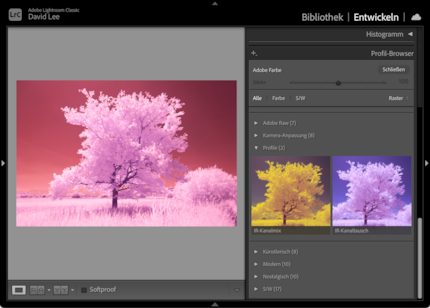
These profiles are just a starting point; the colours still need more editing. Colour grading works well, where I adjust the mids and highlights in the desired direction. The dark sky remains largely unaffected. I find editing with the colour mixer counterintuitive: to change the blue, I have to tweak the reds and vice versa. And most of the controls have no effect anyway because the colour distribution of an infrared image is very one-sided.
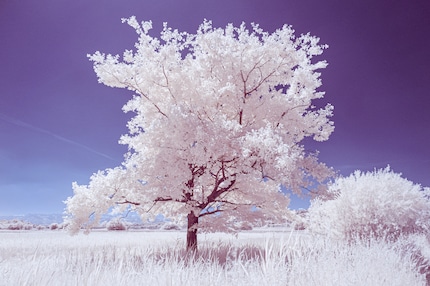
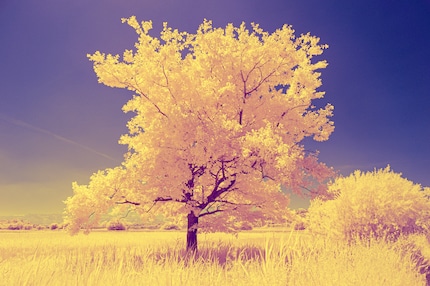
You can’t change anything about the channel mix itself in Lightroom. You still need Photoshop for that. An efficient workflow would probably be to first get an overview in Lightroom by selecting the infrared profiles. After that, you can always switch to Photoshop for a single image that’s really worth it.
Download infrared profiles for Lightroom
My interest in IT and writing landed me in tech journalism early on (2000). I want to know how we can use technology without being used. Outside of the office, I’m a keen musician who makes up for lacking talent with excessive enthusiasm.
Interesting facts about products, behind-the-scenes looks at manufacturers and deep-dives on interesting people.
Show all