
Guide
Migrating my SIN: long live Boba Fett!
by Martin Jud

I've been doing what Netflix and Amazon do for a long time now. I've set up my own NASflix, a media server with the sweet name of Judtube. In this article, find out how easy it is to stream your films and music wherever you want thanks to Plex.
A personal media server lets you stream your films, series or music to any device while you're on the train, on holiday or even in bed. All you need is a NAS and client-server media management software like Plex.
As with Netflix, multiple users can stream simultaneously. However, you'll need sufficiently powerful hardware. My old NAS from 2012 didn't do the trick. My new system, on the other hand, can convert up to four UHD streams in parallel.
Here's what I want from my new media server:
Until now, I streamed my media from my old NAS to my devices via sFTP. To do this, I used the open source software Kodi, with which I built my own media databases on each of my devices. A tedious installation that required quite a bit of manual configuration. But thanks to my new, more powerful NAS, that's history. Plex allows me to set up a central media server that plays the content of my media library in the best possible quality on any device - without any additional configuration.

To build a media server, you can rely on loads of software. I've been flirting with Plex Media Server for a few years now, so I'm taking the plunge and installing it straight away. The great thing about Plex is that even with very little computer knowledge you can configure and use the server relatively easily.
You can use Plex for free, but you can also opt for one of the Premium offers. I can't settle for the free version for what I'm planning to do, because only a premium account enables accelerated conversion. This is essential for streaming UHD content off the network. If I broadcast on my smartphone without accelerated conversion, switching to 1080p definition requires 90 to 98% of the processor's power. With upscaling enabled, the figure is around 23%. In short, if I want several users to be able to play content simultaneously, I'm obliged to choose a premium package.
Go to www.plex.tv and click on "Sign Up" in the top right-hand corner to create an account. If you wish, you can then get the Premium Pass. It's available for a month, a year or for life and costs €4.99, €39.99 or €119.99 respectively.
For my NAS, a Plex app is available directly in the operating system shop. But, for reasons unknown to me, the version on offer is not up to date. I therefore advise you to download the software directly from the developer's site. Find here the latest version of Plex Media Server.
Of course, Plex is available for almost all operating systems. If you also have a NAS from Synology, log in to the web interface and open the package centre.
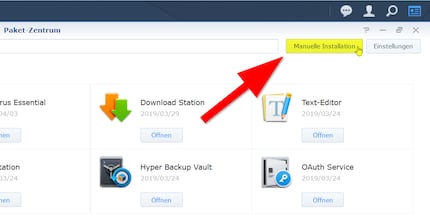
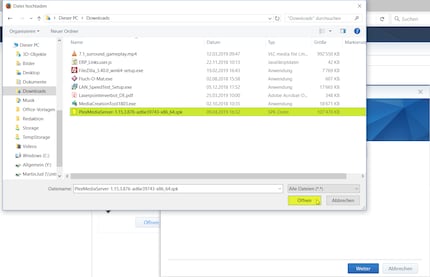
Click on "Manual installation" in the top right-hand corner, open the previously downloaded file and click on "Next". You will then see a notification that the package to be installed comes from an unknown publisher. Only continue if you have actually downloaded the file from the official Plex homepage. Installation takes a few seconds.
Now you start the server. The Plex web interface opens in a new window and first of all asks you to log in with your account. Once you are logged in, you will receive a brief explanation of the basic functions.


With one click, confirm that the server has been found. If necessary, you can overwrite the suggested server name. I christen mine "Judtube". Along the way, I indicate that I'd like to use Plex away from home too by ticking a little box. Plex tries to configure access from outside by itself. If that doesn't work, you'll see a bit below what you can do about it.

You can now add your media content or click "Next" first without adding it and confirm the installation by clicking "Done".
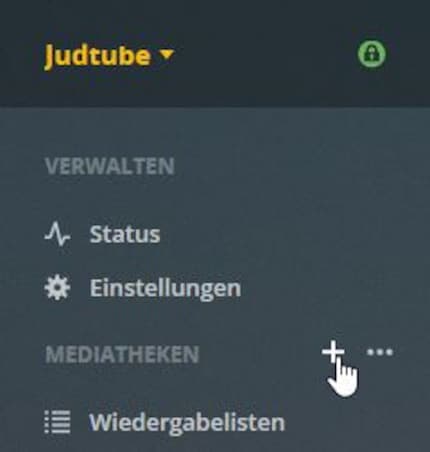
You can add new libraries to your server at any time. As you can see, the initial configuration of the server automatically takes you to this stage. If you want to add your media later, click on the plus symbol, which appears as soon as you hover your mouse over "Media libraries".
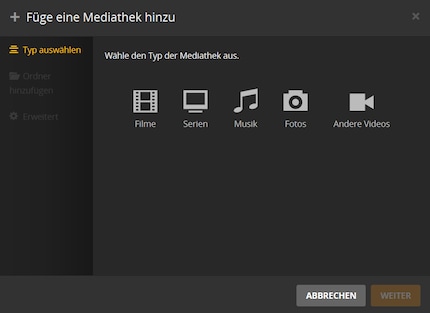
Select the type of content you wish to include.
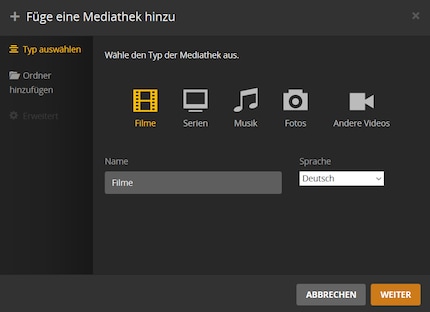
Give the media library a name. This makes sense because you can create several libraries of the same type. You could add your concert Blu-ray Rips to one separately or create a Disney library for your kids. What's more, it's possible to give a user permission only for content of a certain age to protect minors.
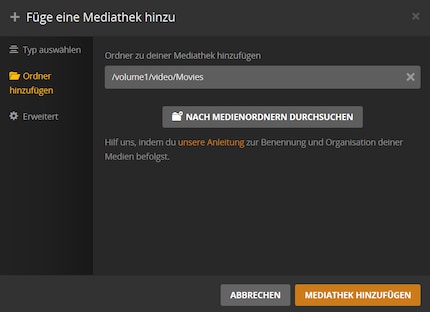
Select the folder in which the content is stored. To be automatically recognised by the system and expanded with information found online (posters, descriptions, etc.), files must be classified and named correctly. For films, it's usually sufficient to include the film title and year in the file name. For series, I always create a directory with the name of the series and create sub-folders in it that start with 'S01' (for season 1) and so on. For music, I have one folder per album, which contains the artist, album title and year of release. If you're not sure what structure or name to adopt, it's best to ask Google for advice or check here (in German).
Under "Advanced", you can configure the media library in detail. Here, for example, you can determine whether it should appear on the dashboard, whether preview thumbnails should be created or which agent should collect information about the films.
After the media library has been added, the server automatically starts to extract information from the network. Depending on the number of media files added, this may take a few minutes or a few hours.
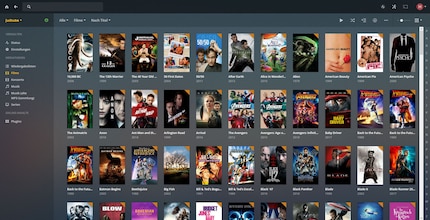
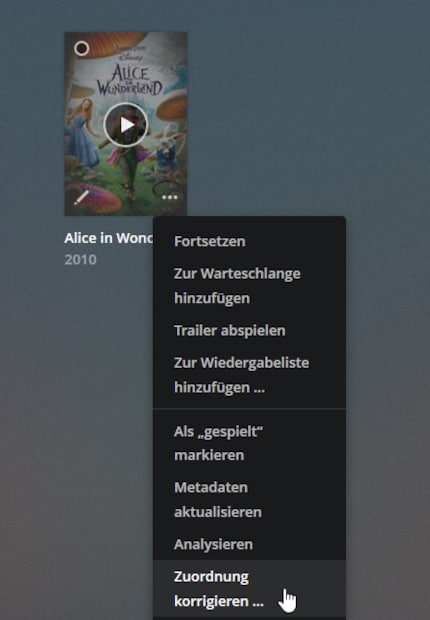
If a film doesn't have a poster and is missing information or has the wrong title, it's probably because the file name is wrong. You can correct this either by renaming the file or by hovering your mouse over the film to be corrected, clicking on the three dots in the bottom right-hand corner and selecting "Correct attribution" from the context menu.
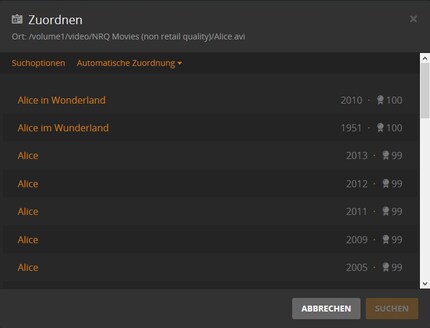
Plex will then automatically make suggestions as to the film in question. If you can't find the right film, click on the orange "search options", you can then find the right film using the text search. Here, the file name is missing the year, which is why the system incorrectly assigned the last Alice film to it. So I click on the second entry with the year 1951...
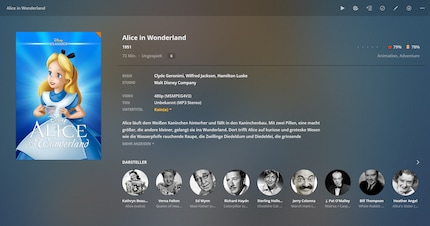
.. after just a few seconds, the poster and film information are corrected.
You can now start installing the Plex app on your devices or connect via your web browser to stream. But at this stage, playback is slow and jerky and video quality leaves something to be desired. To avoid this happening, you first need to make a few adjustments. The best way is to go through all the options. As for me, I'm going to present here the most important points for a good configuration.
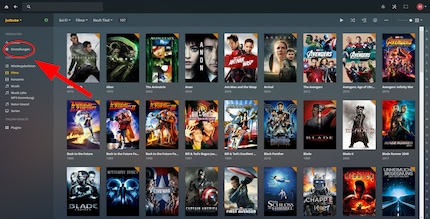
The parameters...
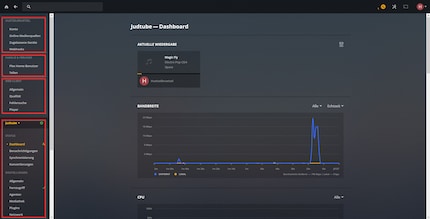
.. are divided into four areas. From top to bottom, you can configure the following: account settings, user settings, client settings, media server settings.
In the "Account" section, you can choose your preferred language for video playback.
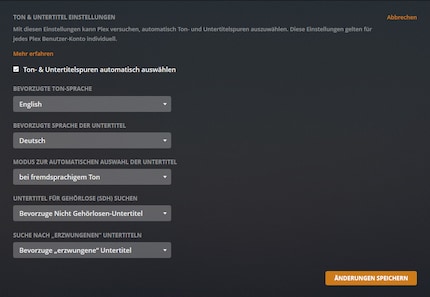
Of course, you can also change the language and subtitles at any time before or during playback.
You can also view your Plex Pass, delete approved devices, select online media sources to display (Tidal, Podcasts, Web Shows) or set up webhooks. Webhooks let you control your Smarthome with Plex, for example. With compatible equipment, you can dim the lights, for example.
Under "Plex Home user", you can activate a guest account or create additional users.
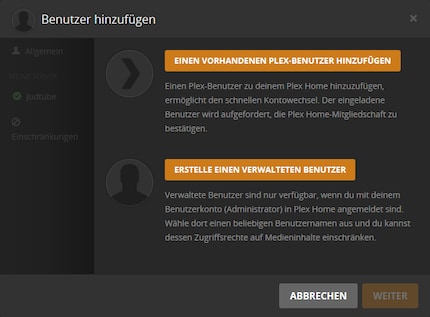
You can add users with an existing Plex account as well as users attached to your personal account. This makes even more sense if you want the user to benefit from the existing Premium Pass. For example, you can only display lyrics like in karaoke with a premium account.
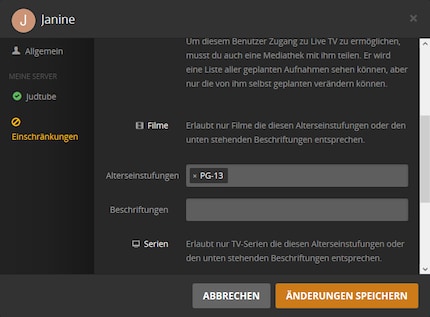
You can then determine which libraries the user has access to. Private videos (Judporn keyword) can thus be easily hidden from unauthorised people. And if the user is a child, you can also set age limits.
If you don't have a Plex app installed on your device, you can also stream your media from the client. To do this, simply go to plex.tv and log in with your account. The following web client settings are also available for the Plex applications on your connected TV or smartphone. In addition, the server remembers the client configuration for each user.
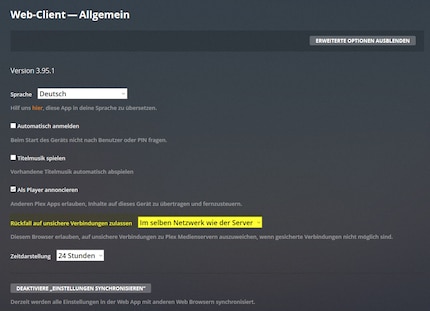
After getting my server up and running, the web client on my home network repeatedly denied me access to Judtube. It was a bit like playing Russian roulette. I was able to solve this problem thanks to the option marked in yellow above. Since I allow unsecured connections to be redirected to the home network, secured in the home network, I no longer have this problem.
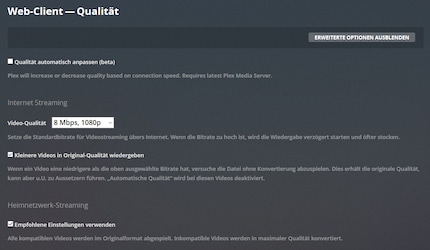
Quality parameters are very important. I tested bit rates and settings for a long time before getting a smooth, good-quality result. We're only talking about client-side server settings here. We'll see a little further down, how the server converts the videos to render better quality.
If, even after following my advice, you still can't find the right settings to get a stable video stream, you can try the "Automatically adjust quality" option. Plex will then try to adjust the stream according to your internet speed and transcode/transmit your videos in variable quality (like Netflix).
Also for "video quality", you can set the default bit rate in the Internet Streaming section. With 8 Mbps for a definition of 1080 pixels, my smartphone almost always manages to play videos smoothly. Only the tunnels are sometimes annoying. The only remedy is to download the content before the journey, which is also possible with Plex. Netflix also plays 1080p videos at around 5 Mbps. To avoid quality degradation for films with bit rates lower than the one selected here, you should activate the "Play smaller videos in original quality" option.
The "Use recommended settings" option in the Home Network Streaming section must also be activated. This ensures that content is played back in existing quality without conversion whenever possible.
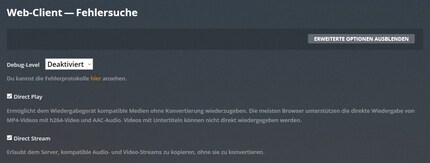
The "Direct Play" and "Direct Stream" items are similar settings to the last ones mentioned. Enable them, otherwise your TV will only play UHD movies on the home network at 1080p definition. Your server would then use energy in vain and transcode the film unnecessarily.
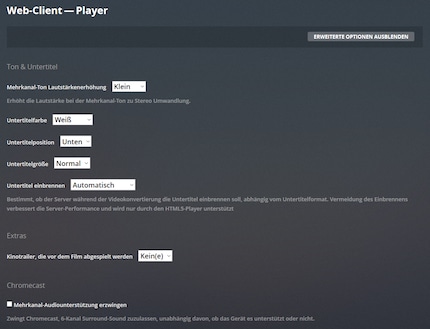
In the player settings, I've set the multichannel volume boost to "small". This compensates for the generally lower volume and prevents hearing damage when I switch from playing a film to FLAC sound.
The most important one here is remote access. It needs to work smoothly, if you want to be able to enjoy your NASflix around the world. At first, with the default settings, I only had sporadic access to my remote server. I solved the problem by configuring port forwarding on my router. If you're also having problems with your remote access, Google for instructions on how to perform a "Port Forwarding" on your router or with your ISP. The media server runs on TCP port 32400. You can also configure routing to another public port if required.
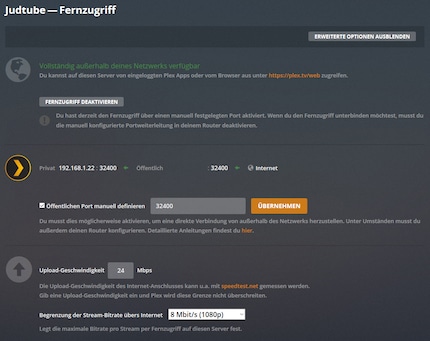
If you have configured port forwarding, specify the corresponding TCP port under "Set public port manually" and click "Apply."
Download speed isn't unimportant either. It depends on your internet subscription. My subscription offers 300 Mbps upstream and 30 Mbps downstream. As I need a bit of upstream speed for things other than Plex, I only free up 24 Mbps. This allows me to stream two films and a bit of music simultaneously, which is more than enough for my household of two people. If I had two children, I'd probably lower the quality to 720p and 4 Mbps or I wouldn't give them access to the server.^^
In the "Internet streaming bitrate limitation" section, you can set the maximum number of Mbps a single stream can have. As already described with the player, I got very good results with 8 Mbps. You may be wondering why you should limit the Mbps of the player. The reason: if another Plex user invites you to add their server to your account, you can't configure that server's bitrate yourself.
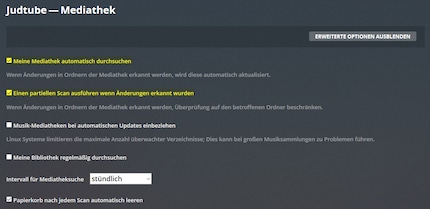
In the media library settings, I recommend that you enable the settings marked in yellow above. That way, your server will automatically recognise films when you add them and integrate them into the media library. For music, I haven't yet activated the automatic update. I manually run the search after adding a new album, as large collections can cause errors when automatically searching on Linux-based operating systems.
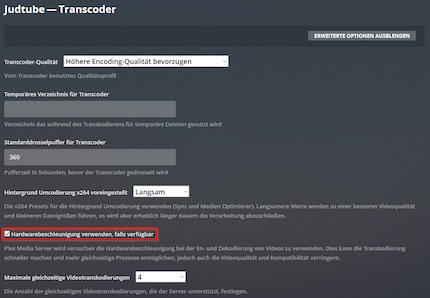
The option boxed in red is the most important of all. At least if you're using your Plex media server with a NAS and a relatively weak processor. With hardware acceleration disabled, my NAS is already struggling to handle transcoding a stream (UHD to 1080p). If I enable this option, I manage to transcode four streams in parallel.
The other settings on this configuration page are no less important, however. But, you'll need to test which settings are best suited to your hardware. With my NAS Synology DS918+, I can set a higher quality encoding quality, a larger buffer and select a slow speed for re-encoding (the slower, the better the quality). My videos start up in seconds and the quality is striking.
That's it, we've gone through the most important settings. I recommend you take a look at the remaining settings and configure them to your preferences.
Wow, Plex really is a very good piece of software. What impresses me most is how easy it is to install and how intuitive it is. I also like the way media libraries are automatically generated and displayed. In terms of functionality, Plex can easily compete with Netflix, Spotify and other streaming services. The only difference is that on Plex your photo, video and audio content comes from a single source - you.
I do think it's a shame, though, that you can't activate accelerated conversion without buying the premium version. But the developers do deserve a little something for making Judtube possible. Especially as, thanks to the premium version, I can also display song lyrics like in karaoke and set up access rights for my non-existent children.
To conclude, here's the biggest downside of Plex for me: when I'm watching a film via the app on my Samsung UHD TV, it happens (about one in five times) that Plex is suddenly unavailable to other devices. So far I've only been able to resolve this by restarting the server. I really hope that this problem will be resolved in a future update, although I've been able to find a replacement solution with the PS4 Pro. I'm also sceptical about the lack of add-ons and plugins, fearing that I'll miss out on some of the extra functionality they offer. When I was still using Kodi for streaming, the world of add-ons was an enchanted land, catering to my every whim. But let's leave it at that.
We'll see if I'm still as happy with Plex after a few months of use. If it doesn't live up to my expectations, I'll consent to put my foot down and use the Emby media server with Kodi. If you have any other media server software to recommend, I'm all ears.
I find my muse in everything. When I don’t, I draw inspiration from daydreaming. After all, if you dream, you don’t sleep through life.
Practical solutions for everyday problems with technology, household hacks and much more.
Show all