
White balance: the thermometer for your photos
Light has a colour and this discolours your photos. The white balance is there to correct the discolouration. This works quite well automatically, but if you really want to master your camera, you also need to understand the white balance.
The cold neon light in the bathroom makes me look sick even when my face is a healthy colour. White walls appear reddish in warm candlelight and yellowish in the evening sun. The colour of an object therefore depends not only on its surface, but also on the light that illuminates it. Because what we perceive as colour is reflected light. And light is not simply white. The colour differences of light sources are referred to as colour temperature. For lamps, the colour temperature is specified in the same way as the watt consumption.
However, we are only aware that light has a colour in exceptional cases. As a rule, we are unaware of the colour temperature because the human brain unconsciously compensates for these differences. A white coffee cup is always white to us, regardless of whether it is illuminated by the sun or a kitchen lamp.
Nevertheless, it is good to know something about the colour temperature of light. Especially when taking photos, because cameras work differently to our brains and eyes. The colour temperature also affects the screen settings on your PC or TV. The colour of the light not only determines the colour scheme, but also has an effect on our mood and activity, as it influences our hormone balance.
Red is cold, blue is warm
The colour temperature is given in Kelvin. We categorise blue as cold and red as warm. However, the opposite is true for colour temperature: blue light has a higher Kelvin value than reddish light. You can visualise this by imagining a flame. A reddish flame is colder than a light yellow one, and a blue one is the hottest.
In the Wikipedia article on colour temperature you will find a table of light sources and their approximate Kelvin temperature. Here is a shortened version:
| 1500 K | Kerze |
| 2600 K | Glühlampe (40 W) |
| 3000–3200 K | Halogenlampe (12 V) |
| 3400 K | Spätabendsonne |
| 4000 K | neutrale Leuchtstofflampe |
| 5000 K | Morgensonne |
| 5500–5800 K | Mittagssonne |
| 6500–7500 K | bedeckter Himmel |
| 7500–8500 K | Nebel |
| 10 000 K | [Blaue Stunde](https://de.wikipedia.org/wiki...) |
The white balance: temperature information for the camera
A camera needs to know «» what colour temperature a light source has, otherwise there will be a colour cast in the image. Every digital camera is able to determine this value automatically. This is called automatic white balance (in English «automatic white balance», AWB for short). This measurement hardly makes any errors with today's cameras. However, there are situations in which even the best automatic system will not give you what you want. Because it can't know what you want.
For example, you want the sky to be yellowish or reddish at sunset. However, the camera adjusts the white balance so that the sky is blue.
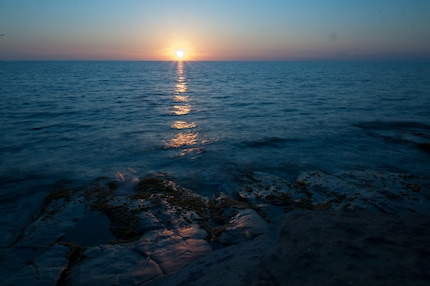
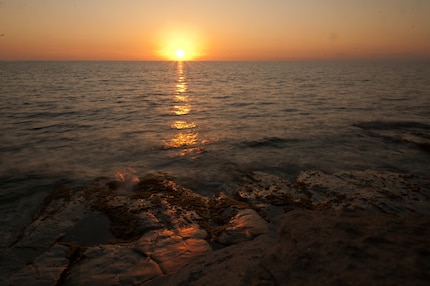
I wrote earlier that a low Kelvin value corresponds to warm light. In the sunset images, it is exactly the opposite. This is because the value «7130 K» is not the actual colour of the light, but the temperature that you specify to give the image a certain colour. If the light is actually colder, the image will be reddish.
Some cameras don't always produce exactly the colour you want. I had this problem with my smartphone and previously with a Panasonic compact camera. The automatic white balance was too cool for my liking in both cases.
In such cases, you have to intervene yourself and correct the white balance. There are three different ways to do this:
- You set the white balance manually
- You modify the automatic white balance
- You correct the white balance on the computer afterwards.
Let's take a look at the options one by one.
Adjust manually
Your camera is set to automatic white balance at the factory. You can change this by pressing the button labelled «WB» (white balance). For cameras that do not have such a button, switch to the (quick) menu.
If you now set the white balance to «Cloudy», for example, you set a specific Kelvin temperature. This must be approximately the same as the colour temperature of the light source. For light in cloudy weather, this is a good 6000 Kelvin. You can also enter a Kelvin temperature directly on most cameras and even some smartphones.
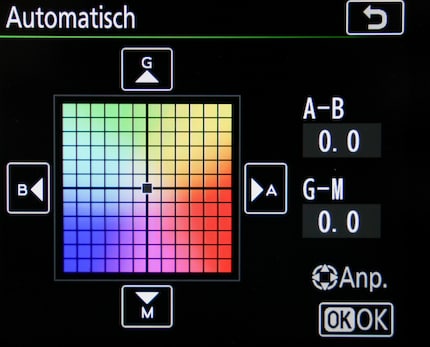
The Kelvin temperature is displayed graphically on a scale between blue and yellow. However, the white balance has two scales: In addition to the blue-yellow scale, there is also the scale between green and pink (magenta). This is because light has a certain colour, and this can also have a different characteristic than just cold or warm. Neon tubes, for example, produce a green tint. The default setting «Neon light» therefore sets the slider towards magenta (the complementary colour to green) to compensate for this.
Both scales can be displayed graphically as an area with x and y axes:
Fine-tune the automatic white balance
The AWB adjustment is useful if you want to modify the general colouring of your camera. However, you will need to gain a lot of experience before you know for sure which setting is right for you. I don't change anything on my current camera as I find its factory colour scheme perfect.
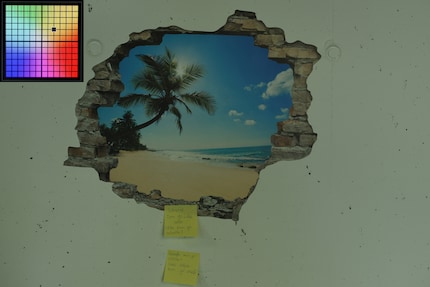
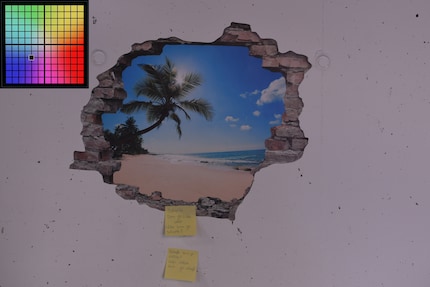
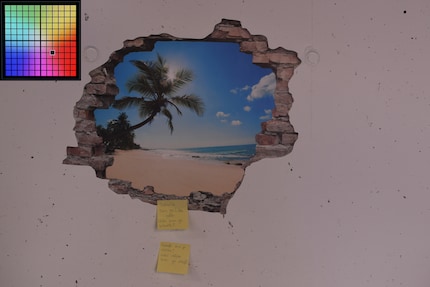
Here's how: Somewhere in the depths of the camera settings, you will find this exact colour square shown above. I can't tell you exactly where, as this varies from model to model. Once you have called up this matrix, you can select any point in the grid using the camera's control pad. This gives the white balance a certain direction. You can do this not only with the AWB, but also with the manual presets. However, this is not the same: a corrected automatic white balance still works automatically, i.e. it adjusts the Kelvin value to the respective situation. If, on the other hand, you correct a preset, you always take photos with the same, slightly different temperature.
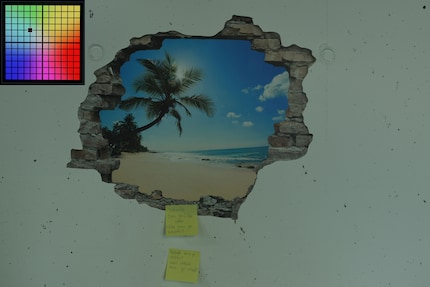
As I said, with my camera I can only make the white balance worse by adjusting it. But as an illustration, here is the same image with different AWB corrections.
Correction on the computer
If you shoot in RAW, you can also adjust the colour temperature afterwards without losing any information. This type of correction is also possible with JPEG, but information is lost in the process. In addition, less colour information is available from the outset, making the corrections less flexible. With video recordings, the white balance should also be correct at the time of recording.
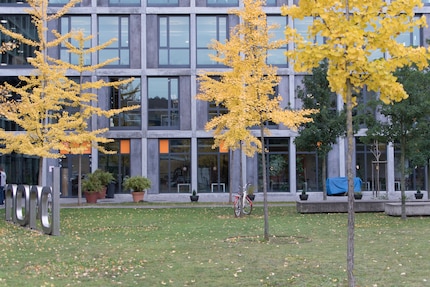
An extreme example to illustrate this. I deliberately shot this image with a completely incorrect white balance in RAW and JPEG (3200 K and as much magenta as possible).
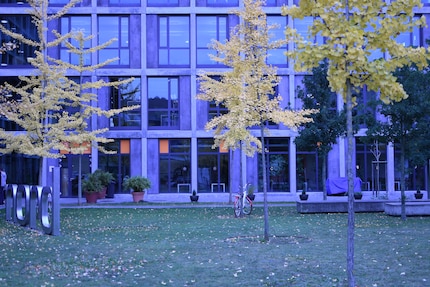
And now the result when Lightroom automatically equalises the JPEG. Although maximum correction was applied, the concrete surfaces on the building are still far too bluish. Lightroom does not allow an even stronger correction, because otherwise it would lead to ugly colour transitions, as you know it from dodgy GIFs or 90s games.
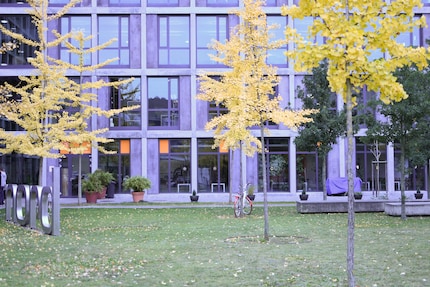
And this is the result of the automatic correction via RAW.
The setting works in the RAW converter (Lightroom or similar) in the same way as in the camera: There are two sliders, one for blue-yellow and one for green-magenta. The usual presets such as «Cloudy», «Daylight» or «Automatic» can also be found here. Das Preset «Wie Aufnahme» zeigt das Bild mit den Werten an, welche die Kamera ermittelt hat. Diese Werte sind als Metadaten in der RAW-Datei gespeichert, haben aber keinen Einfluss auf die Rohdaten selbst. Update, 23.4.2026: Lightroom and other RAW converters do not read this value from the metadata, but try to reconstruct it. The software can also determine an automatic setting, i.e. an automatic setting after the fact.
If there is an area in your image that needs to be neutral - such as a white wall - then you can use the eyedropper tool in Lightroom. Click on the area of the wall and the colour temperature will be adjusted so that this part of the image is neutral.
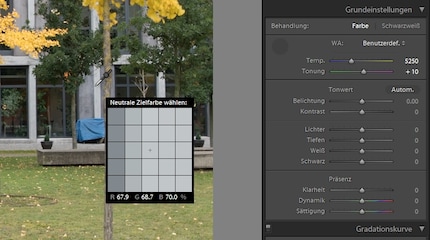
Since RAW correction is lossless, I don't pay much attention to the white balance when taking photos. On automatic and that's it. It's sometimes different in the photo studio. With professionals, the customer may already be watching while the photo is being taken, the images are continuously transferred to the notebook, and it simply makes a better impression if the colouring is right from the start.
Colour profiles in Lightroom
In the Develop mode of Lightroom, you will find the camera calibration at the bottom of the editing area. The profile «Adobe Standard» is set here by default. However, you can also select different camera profiles for most RAW files. The colouring sometimes changes quite dramatically when you change the profile.
The purpose of these camera profiles is to reproduce the colouring that the camera produces when it saves JPEGs. Every manufacturer has its own typical colour scheme. This does not have anything directly to do with the colour temperature, but it does have a strong influence on your perception of what a neutral colour should look like. If you decide to use the camera profiles, you should only set the white balance after you have selected the profile.
Everything so beautifully grey here
Of course, even the best white balance correction is useless if your screen displays the colours completely wrong. But I strongly advise against professional colour management with colour profiles. This is a complicated topic where you can do a lot wrong with half-knowledge - and if you do something wrong, the result is often worse than without any colour management at all. What's more, as a hobby photographer, you probably don't have the time or the nerve to deal with it in depth anyway.
So what should you do? You can eliminate major problems with a few targeted measures in the settings menu of your screen (on-screen menu, OSD for short).
The best way to identify an incorrect colour balance is by using a bright area that should be a neutral grey. For this purpose, I have created an image file that is 1920 x 1080 pixels in size (resolution of my screen) and in which each pixel represents a neutral grey with a brightness value of 85%.

Now set your screen so that this image displays neutral grey. First check that you have not activated any weird presets such as «Movie» or «cool». Select the neutral default setting. In most cases, this is already done. Otherwise, there is a setting in the monitor menu where you can weight the individual colour channels (RGB).
Also check whether the same photo looks roughly the same on the smartphone and the PC screen. There are often stark differences in brightness and contrast. You can also reduce these a little - or at least be aware that smartphone users see your photos differently than you do on your computer.
Short summary
Light always has a certain colour, even if you can't usually see it. The colour depends on the lamp or, in the case of the sun, on the weather and the time of day. The camera must adapt to the colour temperature, otherwise there will be colour casts. In RAW format, you can also adjust the colour temperature afterwards without any losses. But by then at the latest you should know how it all works. Unfortunately, there is no short version for this - read the article.
Titelbild: Adobe Stock/tiero
My interest in IT and writing landed me in tech journalism early on (2000). I want to know how we can use technology without being used. Outside of the office, I’m a keen musician who makes up for lacking talent with excessive enthusiasm.
Practical solutions for everyday problems with technology, household hacks and much more.
Show all